How to Create a Fillable PDF Form (Free, No Adobe Required)
To create a fillable PDF, upload your document to Fill, open the form editor, and add interactive fields like text boxes, checkboxes, and signature fields. Customize each field, then save and share your form. You can do this entirely online—no downloads or Adobe software required.
With a free fillable PDF maker like Fill, you can turn any document into an interactive form in just a few minutes.
In this guide, you’ll learn exactly how to create fillable PDF forms, plus best practices to make your forms easier to complete and more effective for collecting accurate data.
Ready to get started? Turn your document into a fillable PDF in just a few minutes.
What Is a Fillable PDF Form?
A fillable PDF is a digital document that includes interactive fields users can complete directly on their device.
Instead of being a static file, it allows you to add elements like text boxes for typed responses, checkboxes for multiple selections, radio buttons for single-choice answers, dropdown menus for predefined options, and signature fields for electronic signing.

Because everything is completed digitally, fillable PDFs eliminate the need to print, scan, or manually enter data.
They’re widely used for:
- patient intake forms
- contracts
- HR onboarding documents
- applications
- consent forms
Basically any scenario where you need to collect structured, consistent information quickly. This makes them especially valuable for businesses that want faster turnaround times, fewer errors, and a more professional experience for recipients.
Benefits of Using Fillable PDF Forms
Better than static PDFs — no printing or scanning
Fillable PDFs eliminate the need for manual paperwork. Instead of printing documents, filling them out by hand, and scanning them back, users can complete and submit forms instantly from any device. This not only saves time but also removes friction from the process, making it easier for recipients to respond quickly.
Faster data collection and fewer errors
Because fillable PDFs use structured fields, responses are more consistent and easier to process. Required fields ensure nothing important is missed, while dropdowns and predefined options reduce the chances of incorrect or inconsistent data. This leads to cleaner submissions and less back-and-forth to fix mistakes.
Professional, shareable, and secure
Fillable PDFs present a polished, modern experience that reflects well on your business. They can be easily shared via link or email, making distribution simple at scale. Many tools also include built-in security features like encryption, access controls, and audit trails—making them a strong DocuSign alternative for teams that need secure document workflows without the complexity of traditional eSignature platforms.
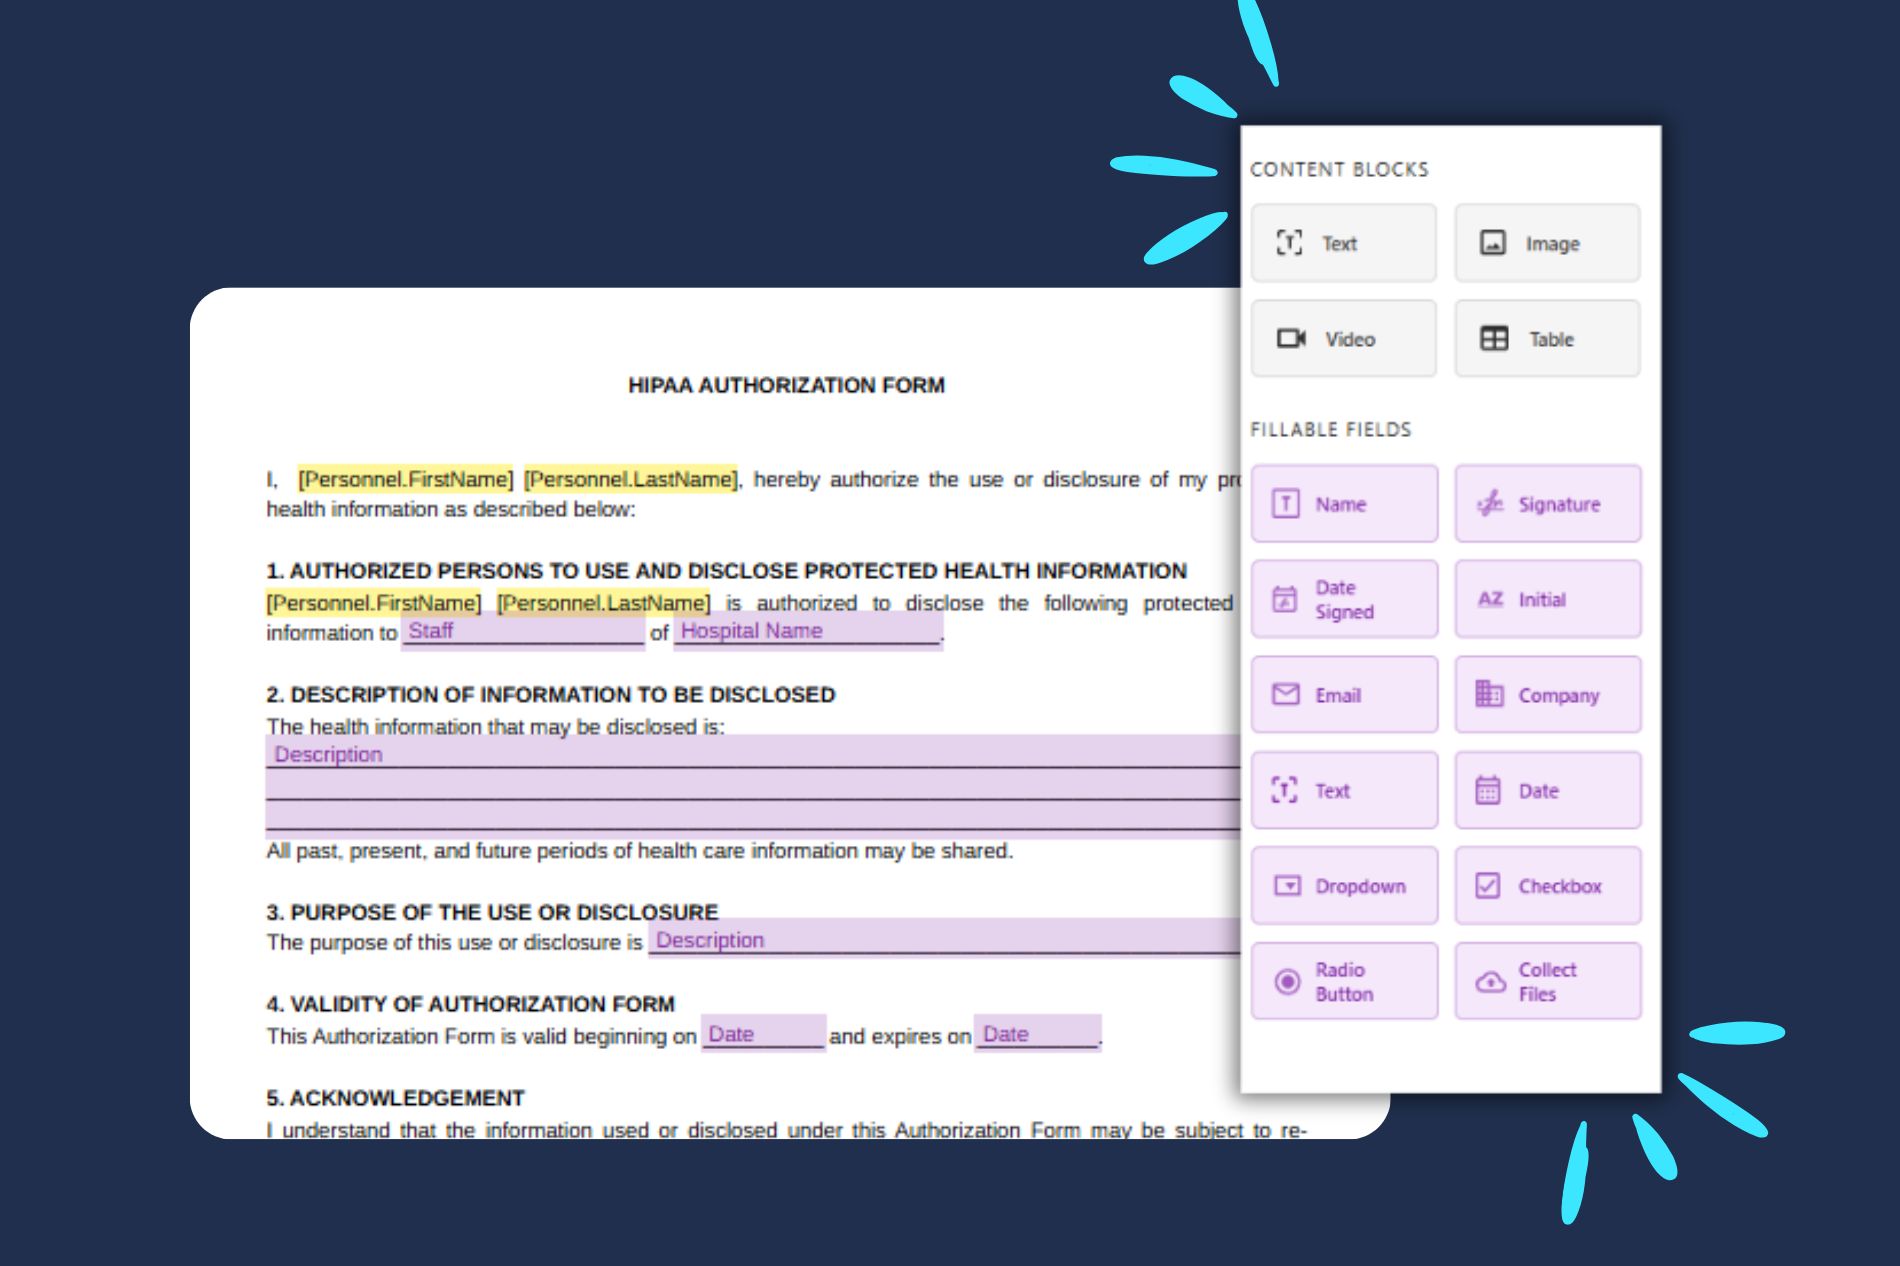
Types of Form Fields You Can Add to a PDF
Text Fields
Used for names, emails, addresses, and open-ended responses. These are the most common field type in any form.
Checkboxes and Radio Buttons
Checkboxes allow multiple selections, while radio buttons restrict users to one choice within a group.
Dropdown Menus and List Boxes
Let users select from predefined options, keeping responses consistent and saving space on the form.
Signature Fields
Enable users to sign documents electronically, making forms legally binding and eliminating the need for printing.
How to Create a Fillable PDF with Fill (Step-by-Step)
Before you start building your form from scratch, you can speed up the process by choosing from ready-made PDF templates. This gives you a strong starting point, whether you’re working from contracts, intake forms, or custom business documents.
Follow these steps to make a PDF fillable:
Step 1 – Upload Your PDF to Fill
Go to Online Forms in the sidebar and click Create Form. Choose Select Files to upload your PDF to Fill’s online editor.
Alternatively, you can select from existing templates or Fill’s extensive Templates Gallery. You can also opt to scan your document using the built-in scanner.
Step 2 – Open the Form Editor
Open the form editor to access the field tools and customization options.

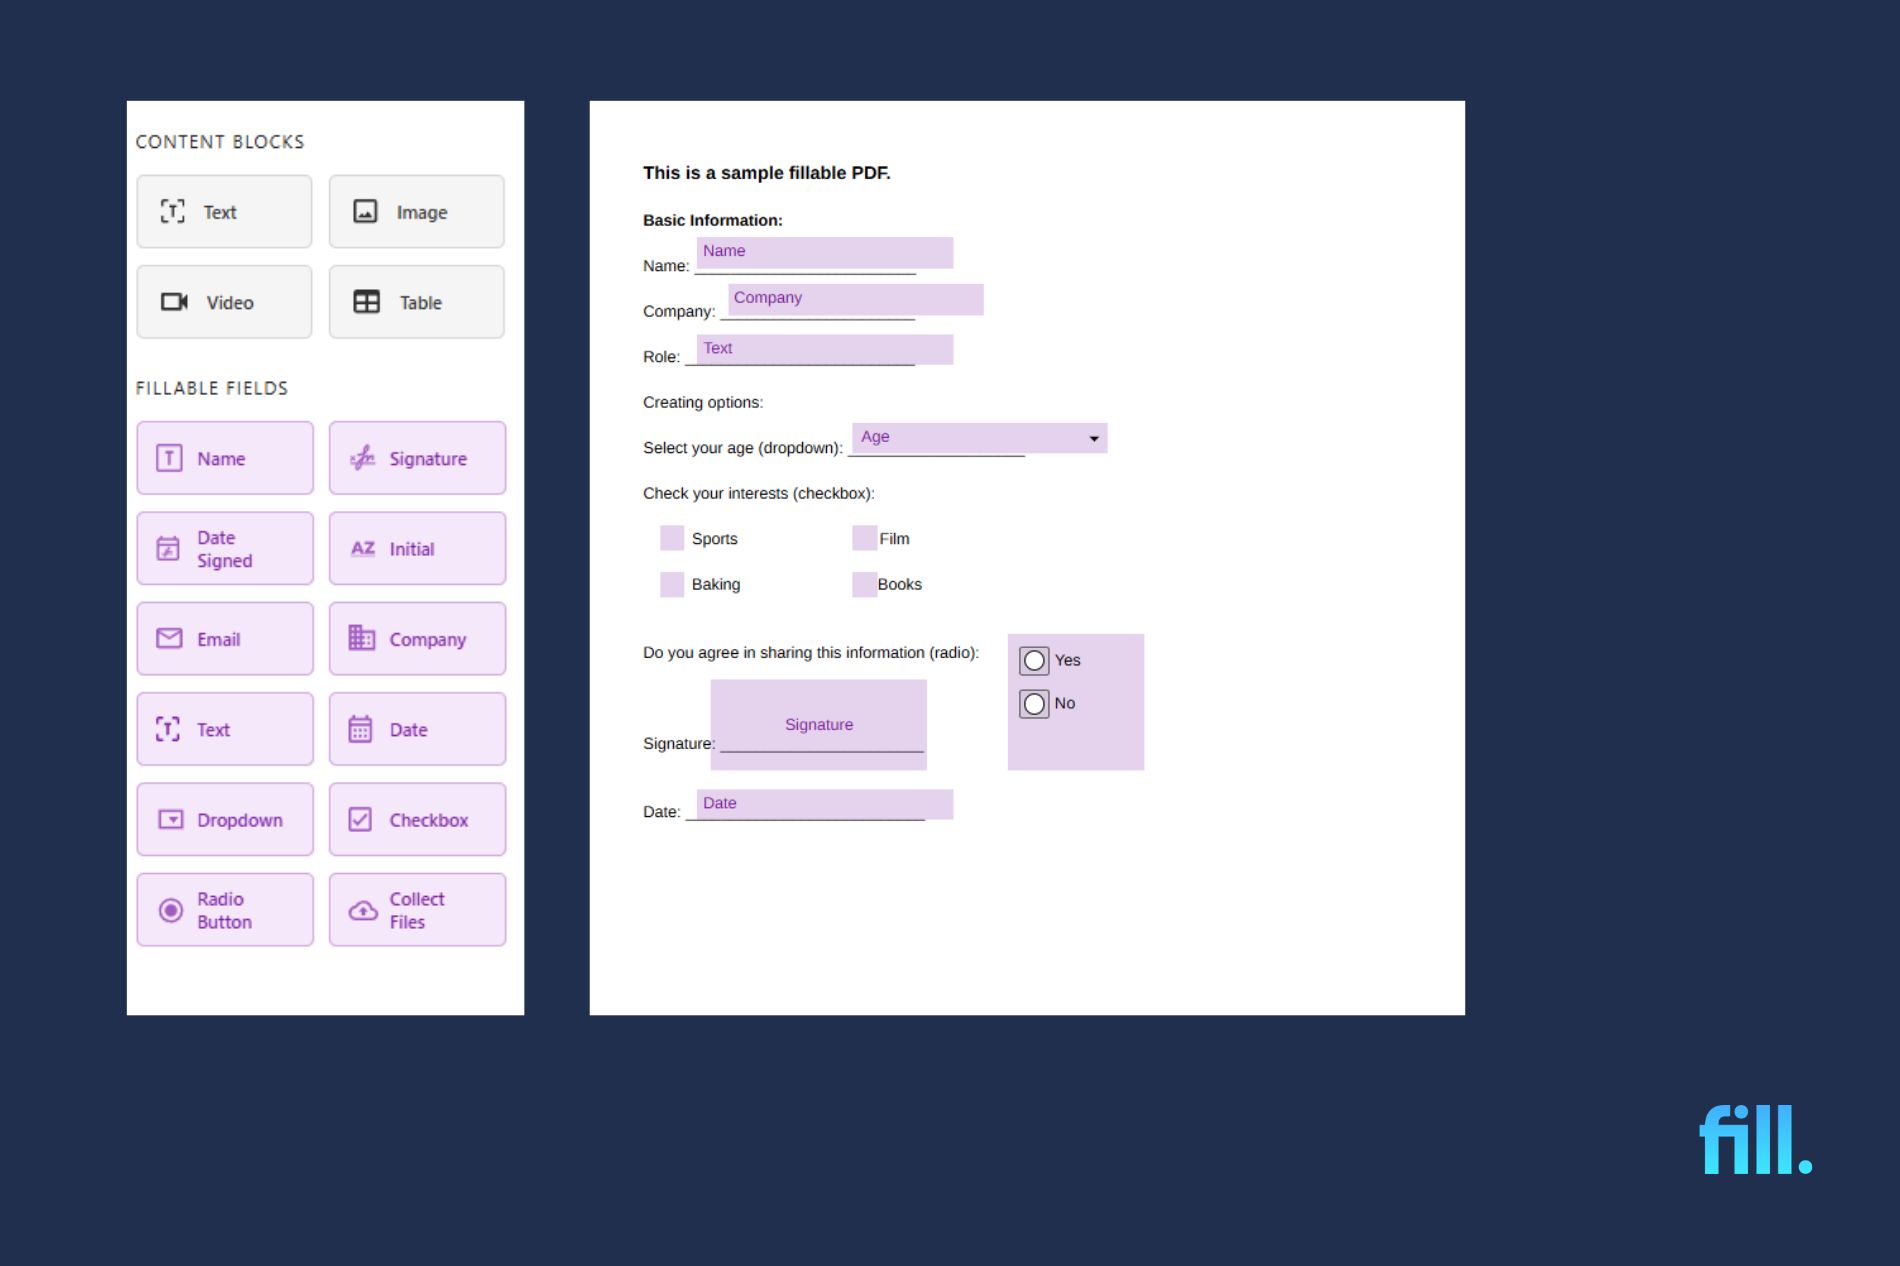
Step 3 – Add Text Fields
Select the text field tool, click anywhere on the document to place it, resize as needed, and assign a field name. Mark the field as required if necessary and add placeholder text for guidance.
Fill offers preconfigured text fields such as Name, Company, Text, and Date Signed. You can also link fields together.
Step 4 – Add Checkboxes and Radio Buttons
Select the checkbox or radio button tool, and place it on the form to create selection fields. Use checkboxes for multiple answers or to require the recipient to confirm an item. For example, if you need to agree to the Terms and Conditions. Use radio buttons for single-selection questions, such as demographic questions.
Step 5 – Add a Dropdown Menu
Select the dropdown field, place it on the document, and enter your list of options. Set a default value if needed to guide users and enable multi-selection options if they can select several answers.
Creating Fields With Conditional Logic
Every fillable field includes a Rules option that allows you to create conditional logic. You can show or hide fields based on specific conditions—for example, displaying additional questions only when a user selects a certain answer.
To create conditional fields, click the field and open the sidebar, then select Rules and define your If–Then conditions. Make sure all related fields are already added to the document before setting up and enabling your rules.
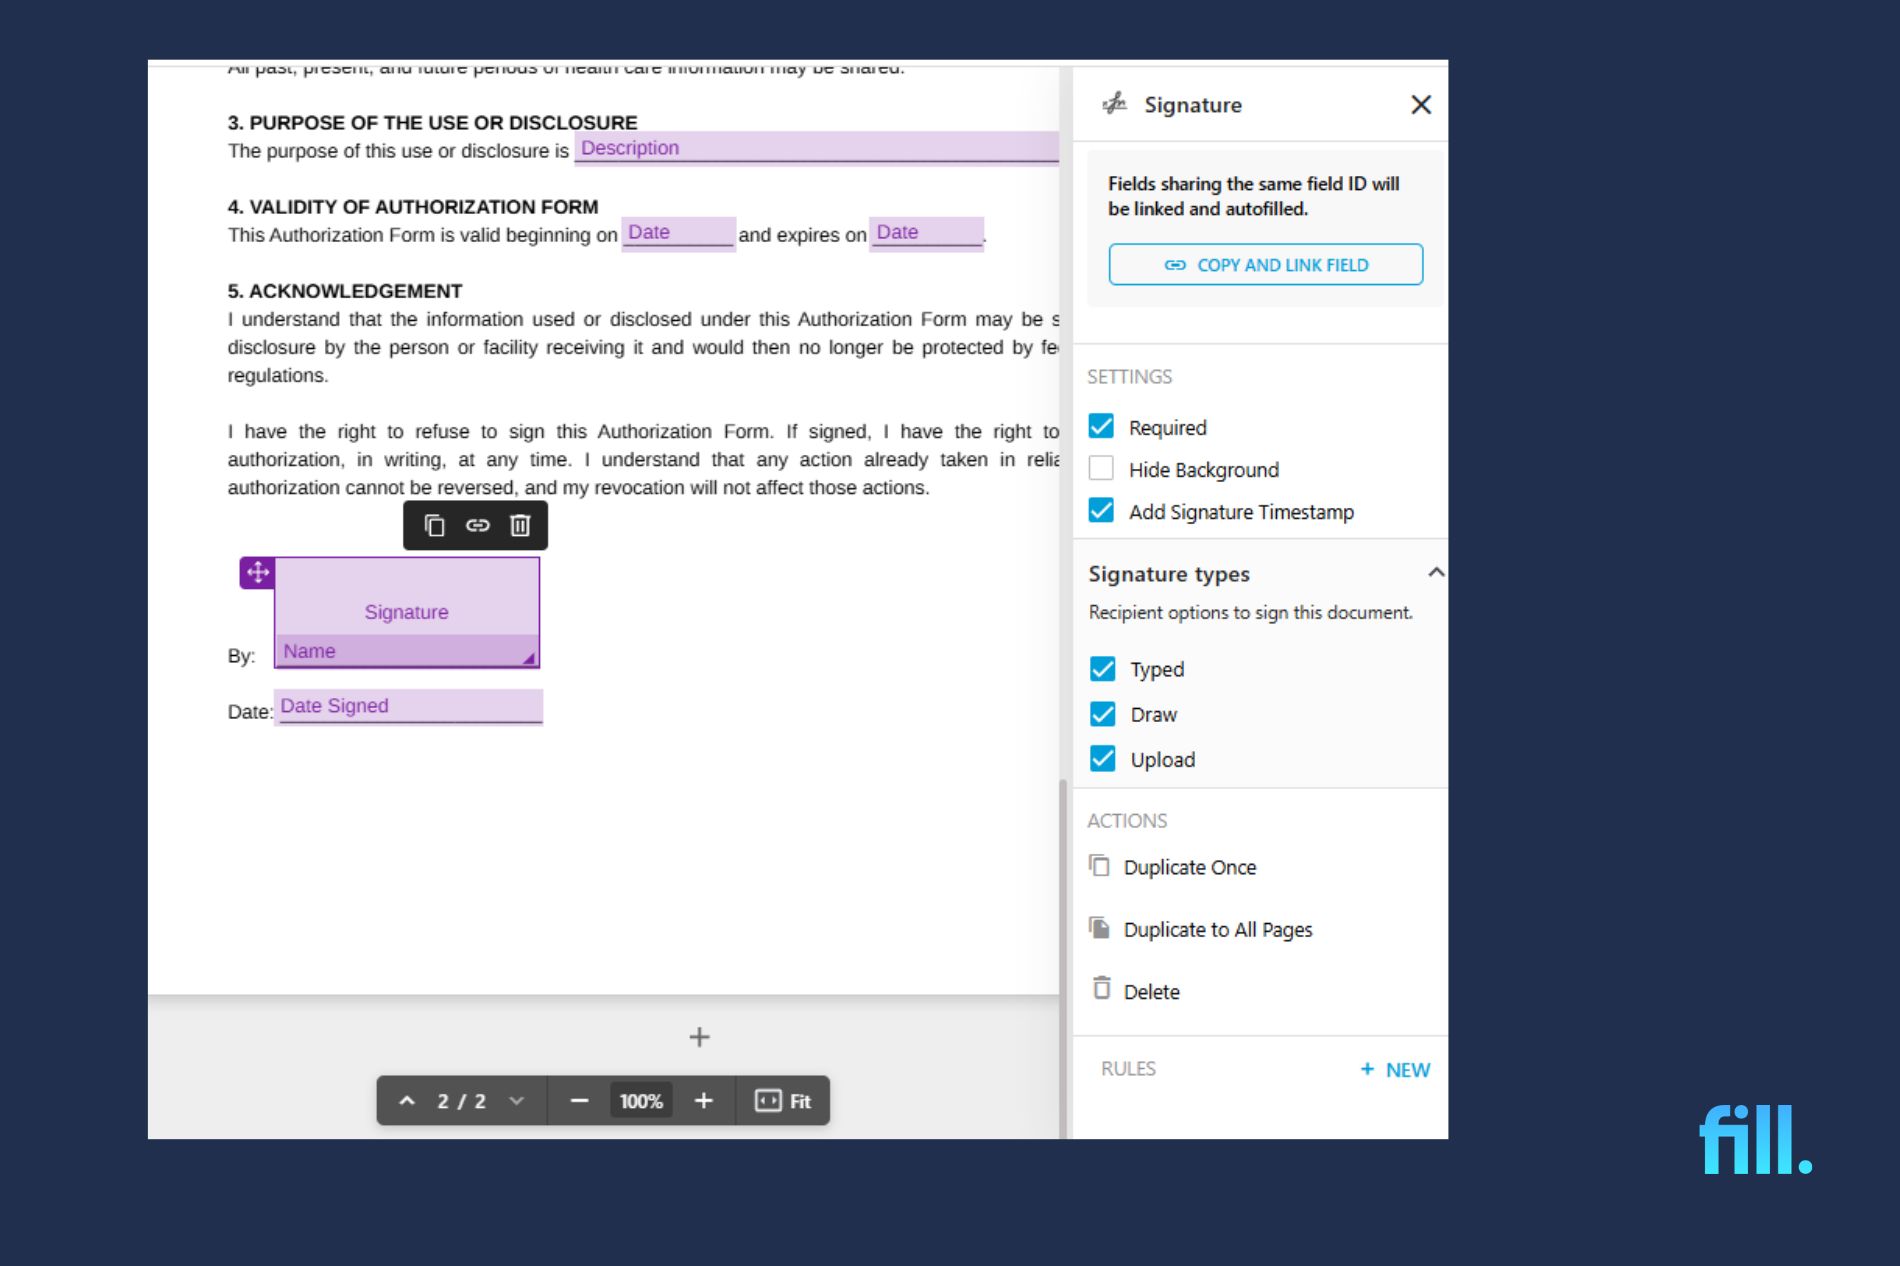
Step 6 – Add a Signature Field
Select the signature field and place it where users need to sign. This allows recipients to electronically sign the document using Fill’s electronic signature tool. You can accept typed, drawn, or handwritten signatures.
If you need recipients to initial a document, choose the Initials Field and place it in the document. For both the signature and initials fields, you can choose to display the timestamp by clicking the relevant option.
Step 7 – Save and Download Your Fillable PDF
Review the document and check for any missed items or errors. Once done, save your completed form, then generate a shareable link to send to recipients. You can also verify your form’s completeness by choosing Test As Respondent.
Want to try it yourself? Open the editor and start building your fillable PDF in real time.
How to Create a Fillable PDF from a Word Document
Upload your Word document directly to Fill, where it is automatically converted to PDF. Once the file is converted, open the form editor and begin adding fillable fields such as text boxes, checkboxes, dropdowns, and signature fields using the same steps described earlier in this guide. This approach is ideal when you’re starting with structured documents, such as contracts, applications, or onboarding forms, created in Word.
Alternatively, you can first save your Word document as a PDF, then upload it to Fill for editing. Both methods work, but direct upload is usually faster and reduces formatting issues during conversion.
From a Scanned Form or Paper Document
Upload your scanned document or image-based PDF to Fill, then manually place fillable fields on top of the form. This is useful for digitizing paper-based workflows. For best results, use a clean, high-resolution scan to ensure fields align properly. If possible, start with a digital file (Word or PDF) to achieve more accurate formatting and easier field placement.
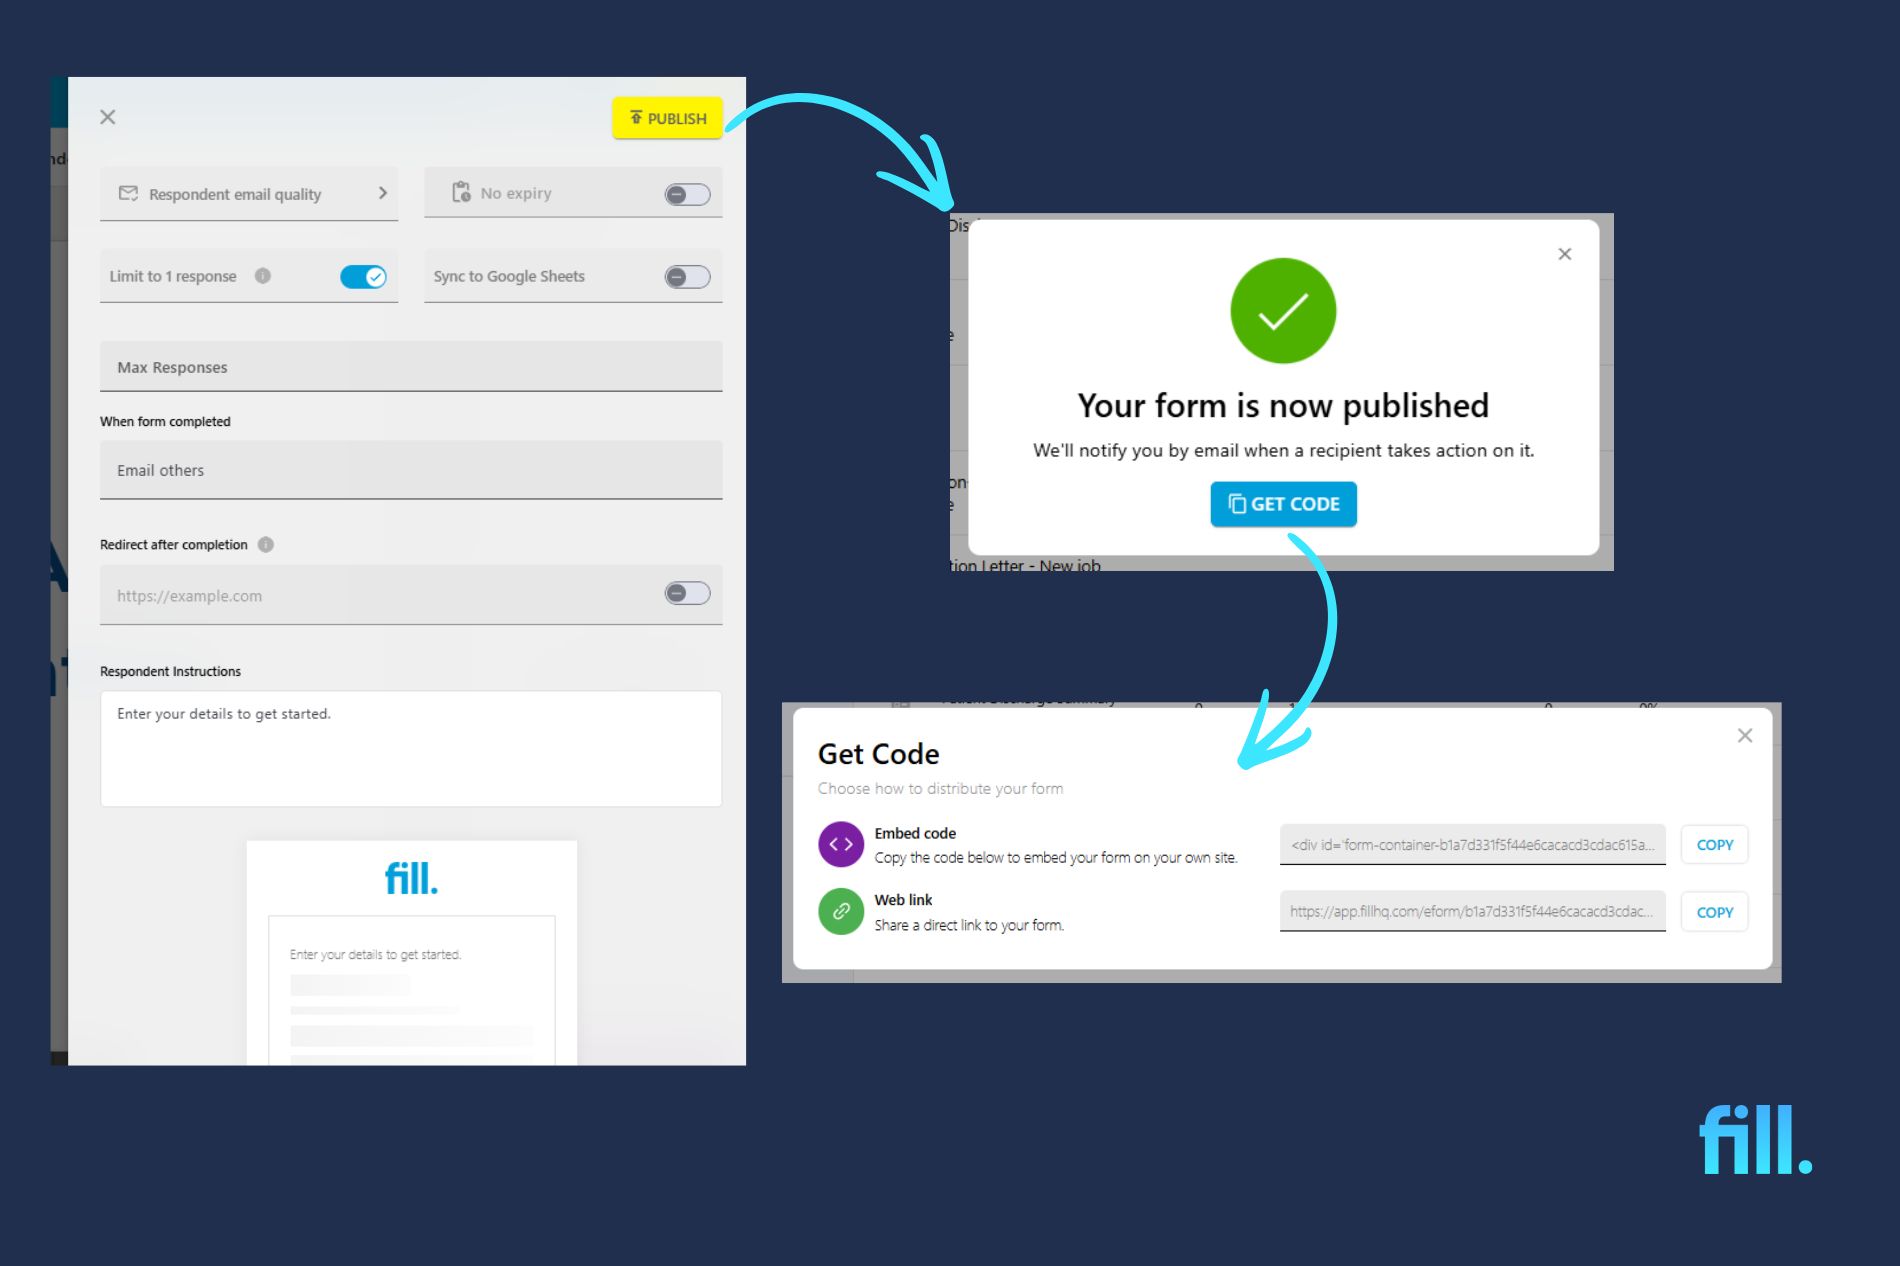
How to Share Your Fillable PDF and Collect Responses
After creating your form in Fill, you can generate a shareable link that allows users to access and complete your fillable PDF instantly. You can also send the form directly via email from the platform, making it easy to distribute to individuals or large groups without exporting files or using external tools. If needed, you can also embed the form on your website or app using a generated code snippet.
Once your form is shared, you can track responses in real time through your dashboard. This includes monitoring who has completed the form and receiving instant notifications when submissions come in. You can also download completed responses for record-keeping or further processing.
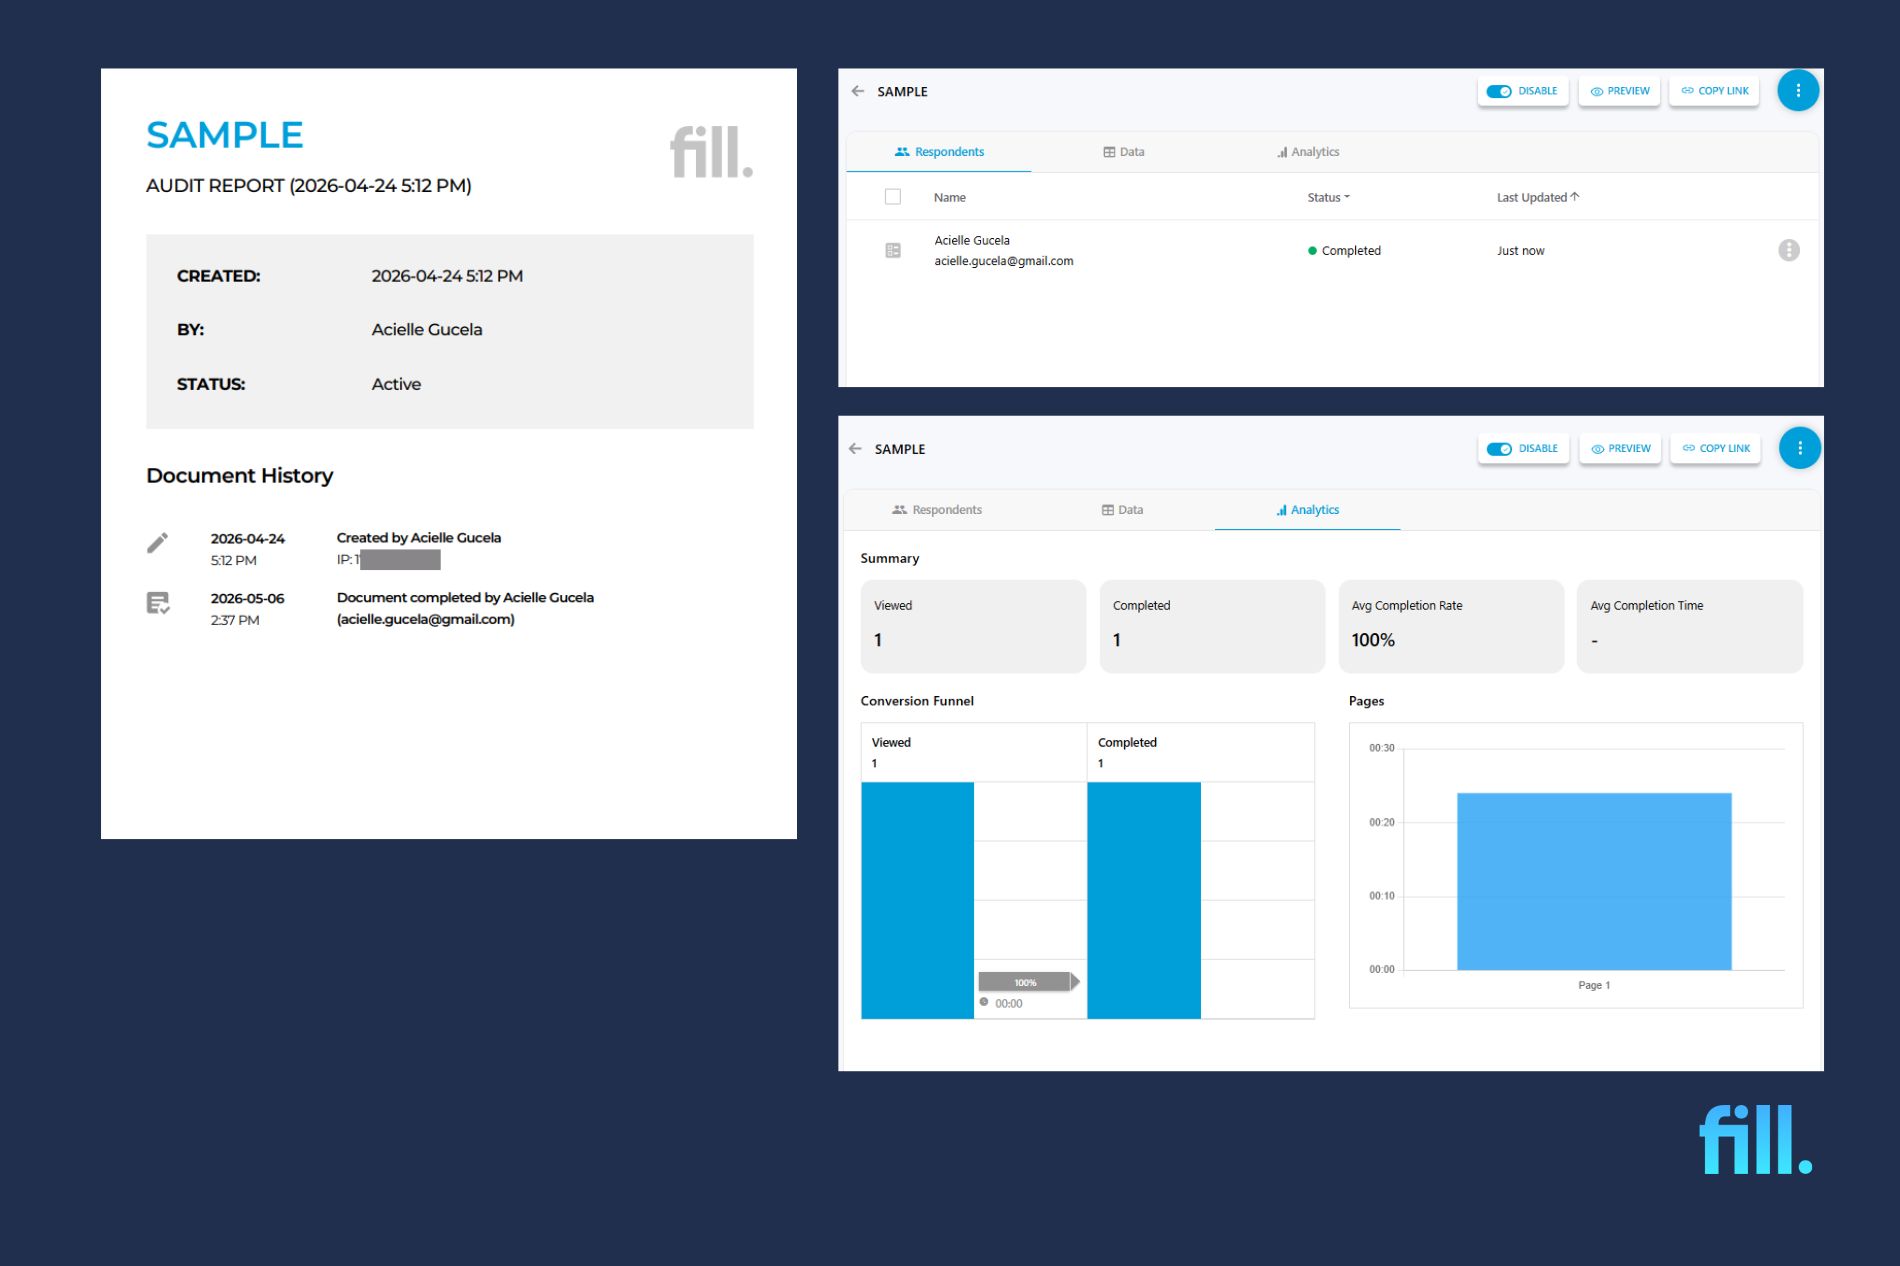
In addition, Fill provides an audit trail for every submission, giving you clear visibility into when a form was opened, completed, and submitted. This helps improve accountability and makes it easier to manage workflows that require verified documentation, especially for HIPAA-compliant forms and other sensitive data collection processes.
Tips for Creating Better Fillable PDF Forms
- Keep labels clear and concise to avoid confusion
Use short, direct labels that clearly explain what information is required. Avoid vague wording so users immediately understand what to enter in each field.
- Use the correct field type for each question
Match each question with the right input type—use text fields for open answers, checkboxes for multiple selections, radio buttons for single-choice questions, and dropdowns for predefined options.
- Mark important fields as required
Set essential fields as required to ensure you collect all necessary information. This helps prevent incomplete submissions and reduces the need for follow-ups.
- Test your form before sharing it
Always preview and test your form as a user before distributing it. This helps you catch alignment issues, missing fields, or confusing instructions.
- Optimize for mobile users with properly spaced fields
Ensure fields are large enough and spaced properly so users can easily tap and complete them on mobile devices without errors.
- Keep file size small for faster loading and sharing
Compress your PDF where possible and avoid unnecessary images or elements. Smaller files load faster, improve user experience, and reduce submission friction.
Now that you know how to create a fillable PDF, the fastest way to apply it is to build your first one. Ready to create your first fillable PDF?
Frequently Asked Questions
Can I create a fillable PDF for free?
Yes, you can create a fillable PDF for free using Fill. You can upload your document, add form fields, and share it without needing paid software like Adobe Acrobat.
Do recipients need special software to fill in the form?
No, recipients can fill out your form using any web browser. Fill allows users to complete and sign documents online without downloading additional software.
How do I add an electronic signature field?
Add a signature field by selecting the signature tool in Fill’s form editor and placing it on your document. This enables users to sign electronically using their mouse, keyboard, or touchscreen.
Does Fill work on Mac and Windows?
Yes, Fill works on both Mac and Windows since it runs entirely in your web browser. It’s also accessible on mobile devices, making it easy to create and fill forms anywhere.
Is the data I collect secure?
Yes, Fill uses encryption and secure cloud infrastructure to protect your data. Features like audit trails and access controls help ensure that all submitted information remains private and compliant with industry standards.
Start Creating Fillable PDFs in Minutes
Creating fillable PDFs doesn’t need to be complicated or require expensive software. With Fill, you can turn any document into an interactive form, add the fields you need, and share it instantly—all from your browser.
Whether you’re building contracts, onboarding forms, or simple data collection templates, Fill makes the process fast, flexible, and free to get started.
Try Fill today and create your first fillable PDF in just a few minutes.

Related Stories

How to Sign a Document (Online, PDF, Word, or on Your Phone)
How to Sign a PDF on an iPhone or iPad Using Mobile Esignatures
View our Privacy Policy for more info.