How to Sign a PDF on Mac Using Fill
Another way of signing a PDF on Mac is by using an electronic signature platform or software.
Ever since using electronic signatures became more prevalent, many companies have launched their own document-signing tool that caters to businesses and individuals alike. Out of the dozens you can find on the market today, one of the most standout applications is Fill.
Fill offers a full suite of innovative features that truly make document management a breeze. Our platform is compliant with federal and international regulations such as HIPAA, GDPR, and GLBA. We also use bank-grade 256-bit encryption to keep your data safe. You can even integrate Fill into your favorite business tools for a more streamlined workflow.
Signing and filing out a PDF on Mac is quite easy with Fill. You can authenticate documents using our desktop app or your web browser.
How to use Fill’s desktop application
1. Download Fill’s electronic signature application for Mac.
2. Launch the application on your computer.
3. Create your account with Fill. If you have one already, sign in.
4. Click the Plus sign button found on the bottom center of the dashboard.
 5. Select how you wish to import the PDF document you wish to fill in.
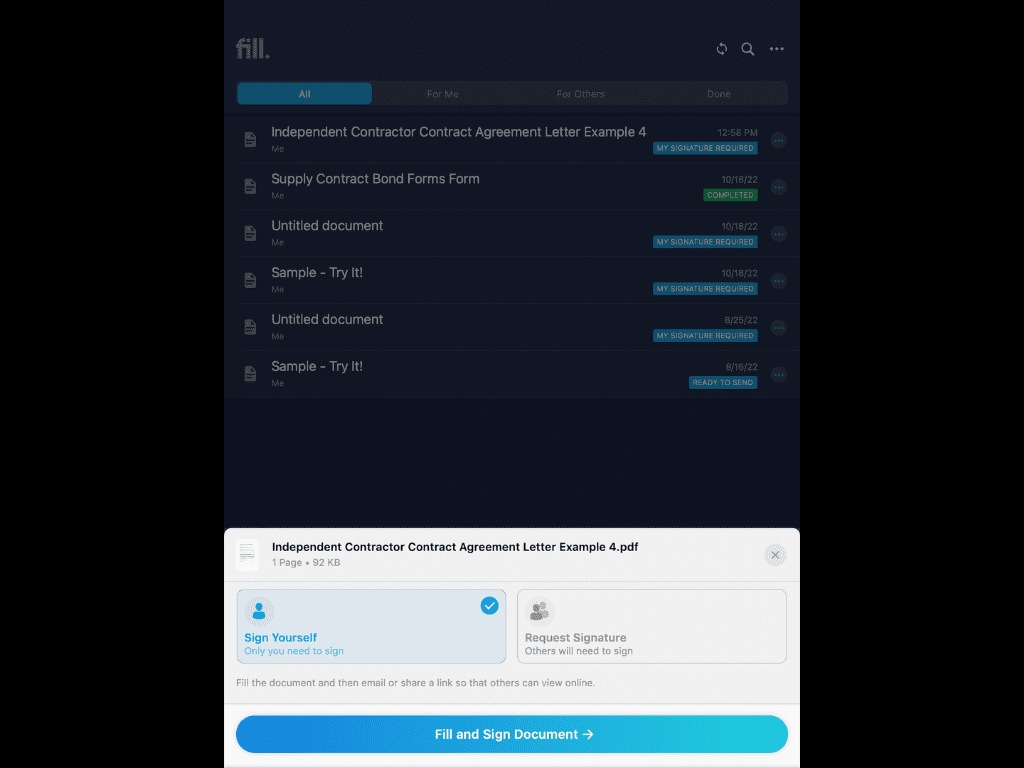
 6. Select Sign Yourself if you’re the only one who needs to sign the document. If there are any other signatories involved, select Request Signature.
7. Click Fill and Sign Document.
8. Click Sign on the Edit menu.

9. Create an electronic signature in one of three ways: typing, drawing, and uploading. Choose the one that you find the most convenient.

10. Once you’re done, click Send.
11. Choose between Download PDF, Send Email, and Send Fax to complete the process.

How to use Fill’s web-based application
1. Visit Fill’s website and sign up for an account.
2. On your dashboard, click Start Now.

3. Select Only Me. You may also select Request Signature if there are other parties that need to sign the PDF document.
4. Drag and drop the document that you wish to sign.

5. Click Insert Signature.

6. Create an electronic signature in one of three ways: typing, drawing, and uploading. Choose the one that you find the most convenient.

7. Move the signature to the appropriate area. You may also resize it if you wish.

8. Once you’re done, click Save.
10. To download the signed copy, simply go back to the dashboard and click the hamburger icon found on the right side of the document. Select Download PDF.

Learning how to sign a PDF on Mac using Fill only takes a few minutes. Our intuitive platform is incredibly easy to use. Plus, there are a lot more features you can enjoy
How to Sign a PDF on Mac Using Preview
Preview is a built-in image and PDF viewer that comes with any macOS device. This software lets you sign a PDF file on your Mac.
There are two ways that you can do it: using your trackpad or web camera.
Sign with your trackpad
1. Open the PDF document you wish to sign on Preview.
2. Click the Show Markup Toolbar button (pencil tip icon).

3. Select the Sign tool.

4. Select Trackpad, then choose Click Here to Begin.

5. Draw your signature on your trackpad. If you don’t like the result, you can start over by pressing any key and clicking Clear.
6. Once you’re happy with your electronic signature, click Done.

7. Click the signature you’ve drawn and move it to the appropriate place. You can also resize it to your liking.

8. Save or export the PDF you just signed.
Use your web camera
1. Open the PDF document you wish to sign on Preview
2. Click the Show Markup Toolbar button.
3. Select the Sign Tool.
4. Select Camera.
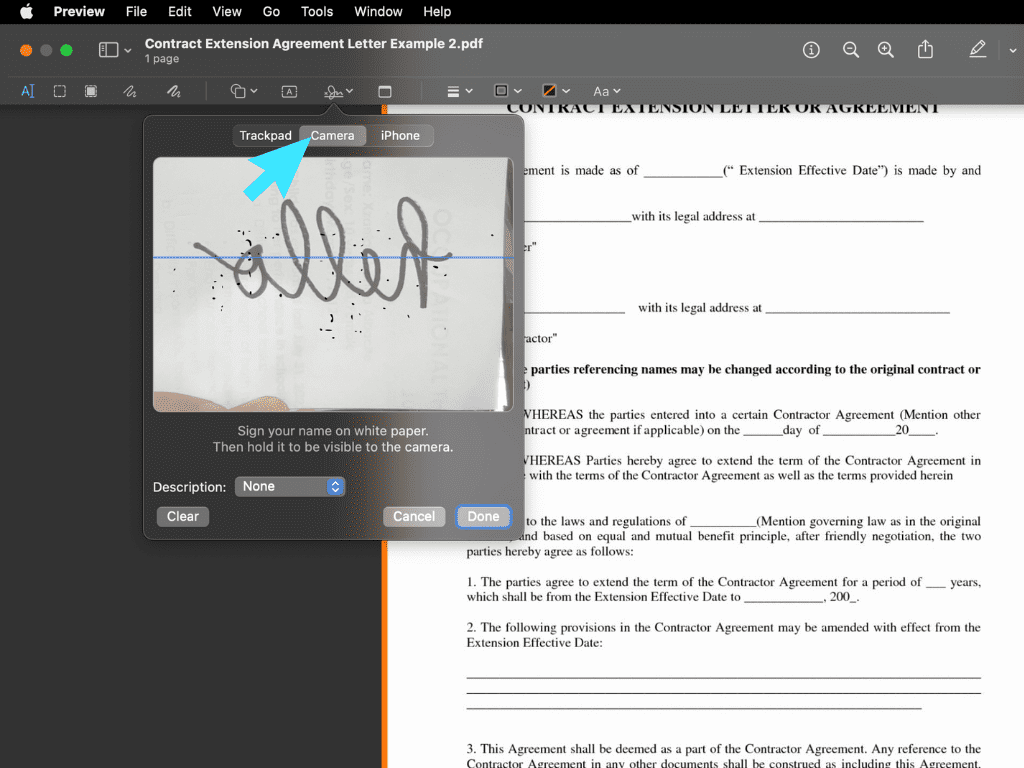
5. On a white piece of paper, draw your signature using a pen or marker.
6. Hold the paper up to your Mac computer’s camera. Make sure the signature is level with the blue line.
7. Once your computer has successfully scanned the paper, you will see the digital copy of your signature on your screen.

8. Click Done.
9. Click the signature you just uploaded and move it to the appropriate area. You can also resize it to your liking.
10. Save or export the PDF document you just signed.
Tips for using Preview to sign a PDF
- For heavier and darker lines, press the trackpad more firmly.
- You can also access the Signature feature on Preview by clicking Tools, then Annotate. Go to Signature and select the esignature you wish to use.
- Your iPhone can also serve as an on-screen canvas to draw your signature. Simply select the iPhone option in the Sign Tool.
How to password-protect a signed document
- Go to File, then Select Export.
- Click the Permissions button.
- Enable Require Password to Open Documents.
- Type in the document password and the owner’s password.
- Click Apply, then Save.