Why choose online forms?
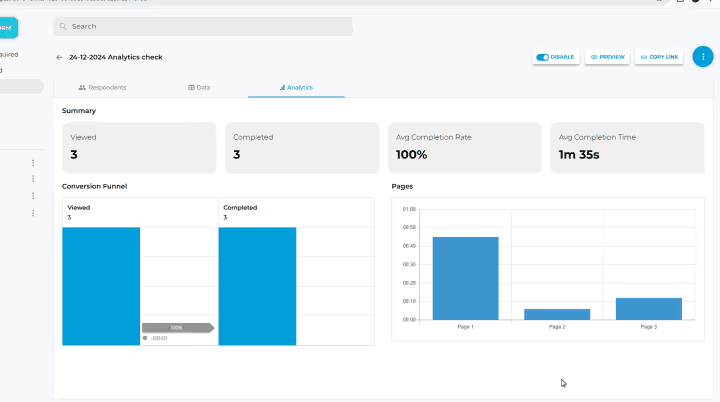
Smart Form Analytics
Track and better understand the behavior of your respondents. Get a better insight on how many people viewed and completed your forms, along with Average Completion Rate and Average Completion Time.
Enhance Data Accuracy
Minimize errors and ensure data accuracy with online validation rules and required fields. Say goodbye to illegible handwriting!
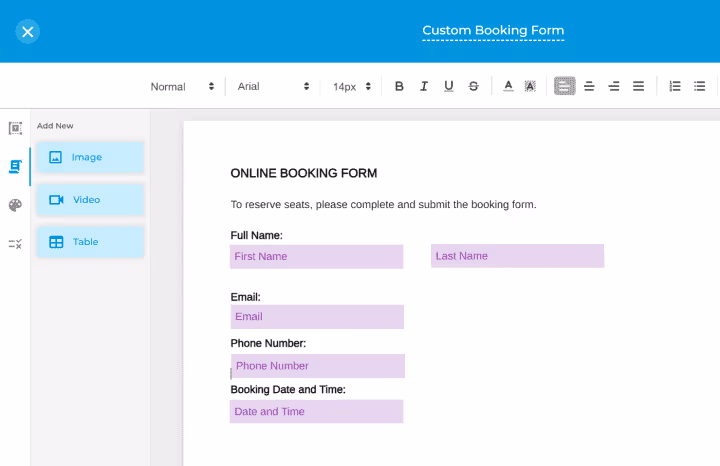
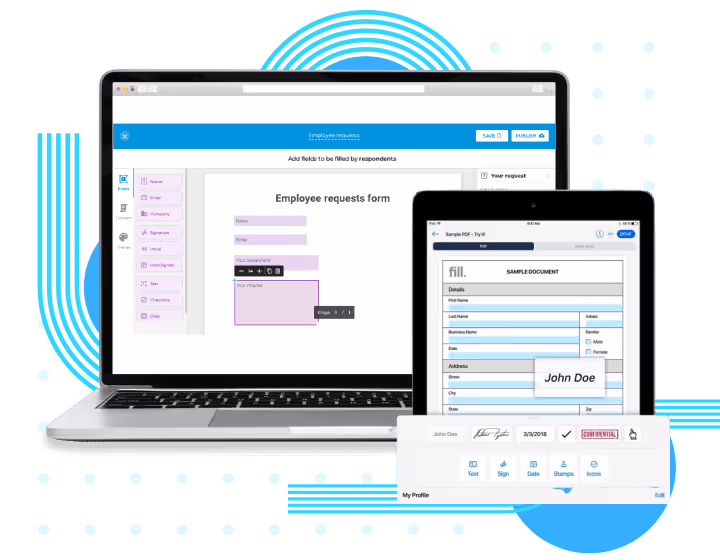
Drag-and-Drop Form Builder
Create stunning forms in minutes with our user-friendly, drag-and-drop interface. No coding skills required! Create variable fields and insert dynamic placeholders (like recipient name, email, or company) that auto-populate based on user input or sender details—perfect for crafting personalized agreements or forms in seconds.

Customizable Templates
Choose from a wide range of professionally designed templates or customize your own to match your brand’s identity, ensuring your branding is consistently applied across all your forms.
Improve User Experience
Create seamless experiences for your users with mobile-friendly forms. Reach your audience anywhere, anytime.

HIPAA-Compliant Online Forms
Use HIPAA-compliant forms to reduce patient wait times and facilitate easier data collection. HIPAA forms also speed up data processing, allowing you more time to perform other essential tasks.
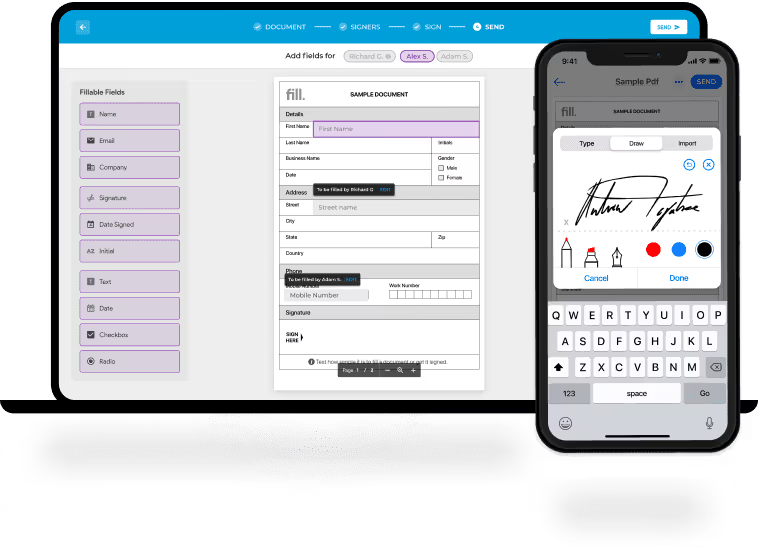
Convert your PDF to Online Forms

Upload a PDF document

Add fillable fields

Publish form
Use our online form to collect signature
Capturing data has never been easier. With Fill online forms you can collect signature without dealing with a ton of paperwork. You can also create and send eforms to your contacts to gather relevant information fast and with minimal errors. Our cross-platform solution allows you to stay on top of your tasks remotely.
Online form creator for various departments

Marketing

Sales

Customer Support

Legal

HR

IT
Industries that rely on online forms
Consulting
Onboard new clients fast while getting the exact information you need to deliver impressive pitches and outstanding results.

Healthcare
Obtain medical records and patient consent with digital forms that are secure and HIPAA compliant.

Education
Create detailed surveys, tests, and assessments that will help you, your students, and colleagues achieve learning objectives.
Tech
Improve the performance of your digital products and applications by allowing users and customers to share their thoughts.
Use cases of Fill's Live Forms

Customer Complaints
Signature Requests
Job Applications
Order Placements
Frequently Asked Questions
What are online forms?
Online forms or eForms are a type of document with fields that can be filled out by multiple respondents. It is particularly useful if you want to collect information from a large number of people.
You can fully customize eforms depending on the information you wish to collect. But what truly makes them handy is that you can access all the collected data in one place. There’s no need to sort through the online forms and individually tally the responses.
Online forms are convenient and accessible. You can share links to digital forms via email or social media, while respondents can provide their answers using a laptop, desktop computer, cell phone, or tablet.
Adopting a digital approach to forms is undoubtedly the best way to go forward. When you sign up with Fill, you can gain full access to our Online Form feature and get the information you need effortlessly.
How do I use the online form creator?
Fill has a comprehensive web form builder tool dedicated to helping you optimize your document workflow by allowing you to create fillable forms on demand. There are three ways you can go about it.
- Create a fillable online form from scratch. You can simply drag and drop fillable fields to a blank sheet.
- Fill offers a wide array of form templates for various industries. Simply add or delete fields and other details based on the information you need from your respondents.
- Lastly, you can simply upload an existing PDF or Word file and convert them into a fillable online form. This is the most convenient way to create forms on Fill.
Before you can create fillable online forms or signature forms on Fill, you need to sign up for an account. However, your respondents can answer these online forms without having to create a Fill account, provided they have the form link.
Aside from ease of use, Fill offers other advantages. For one, you will have the ability to edit and update your forms even if they’ve already been published. You do not need to create a new one in case there are changes you need to make or fields you need to add. You can also reuse online forms that you’ve created with Fill. . Moreover, you can access all the data in one place. There’s no need to go back and forth on your email just to view the answers.
Can I convert PDFs to online forms?
Converting PDF documents to fillable online forms is easy when you use Fill. Here’s how to do it:
- Create an account with Fill, if you haven’t already.
- On your dashboard, click Online Forms found on the Tools menu.
- Click Create Form located on the upper righthand side of the screen.
- Select Upload then drag and drop the PDF file you wish to convert to an online form. Fill will automatically convert it to a secure online form.
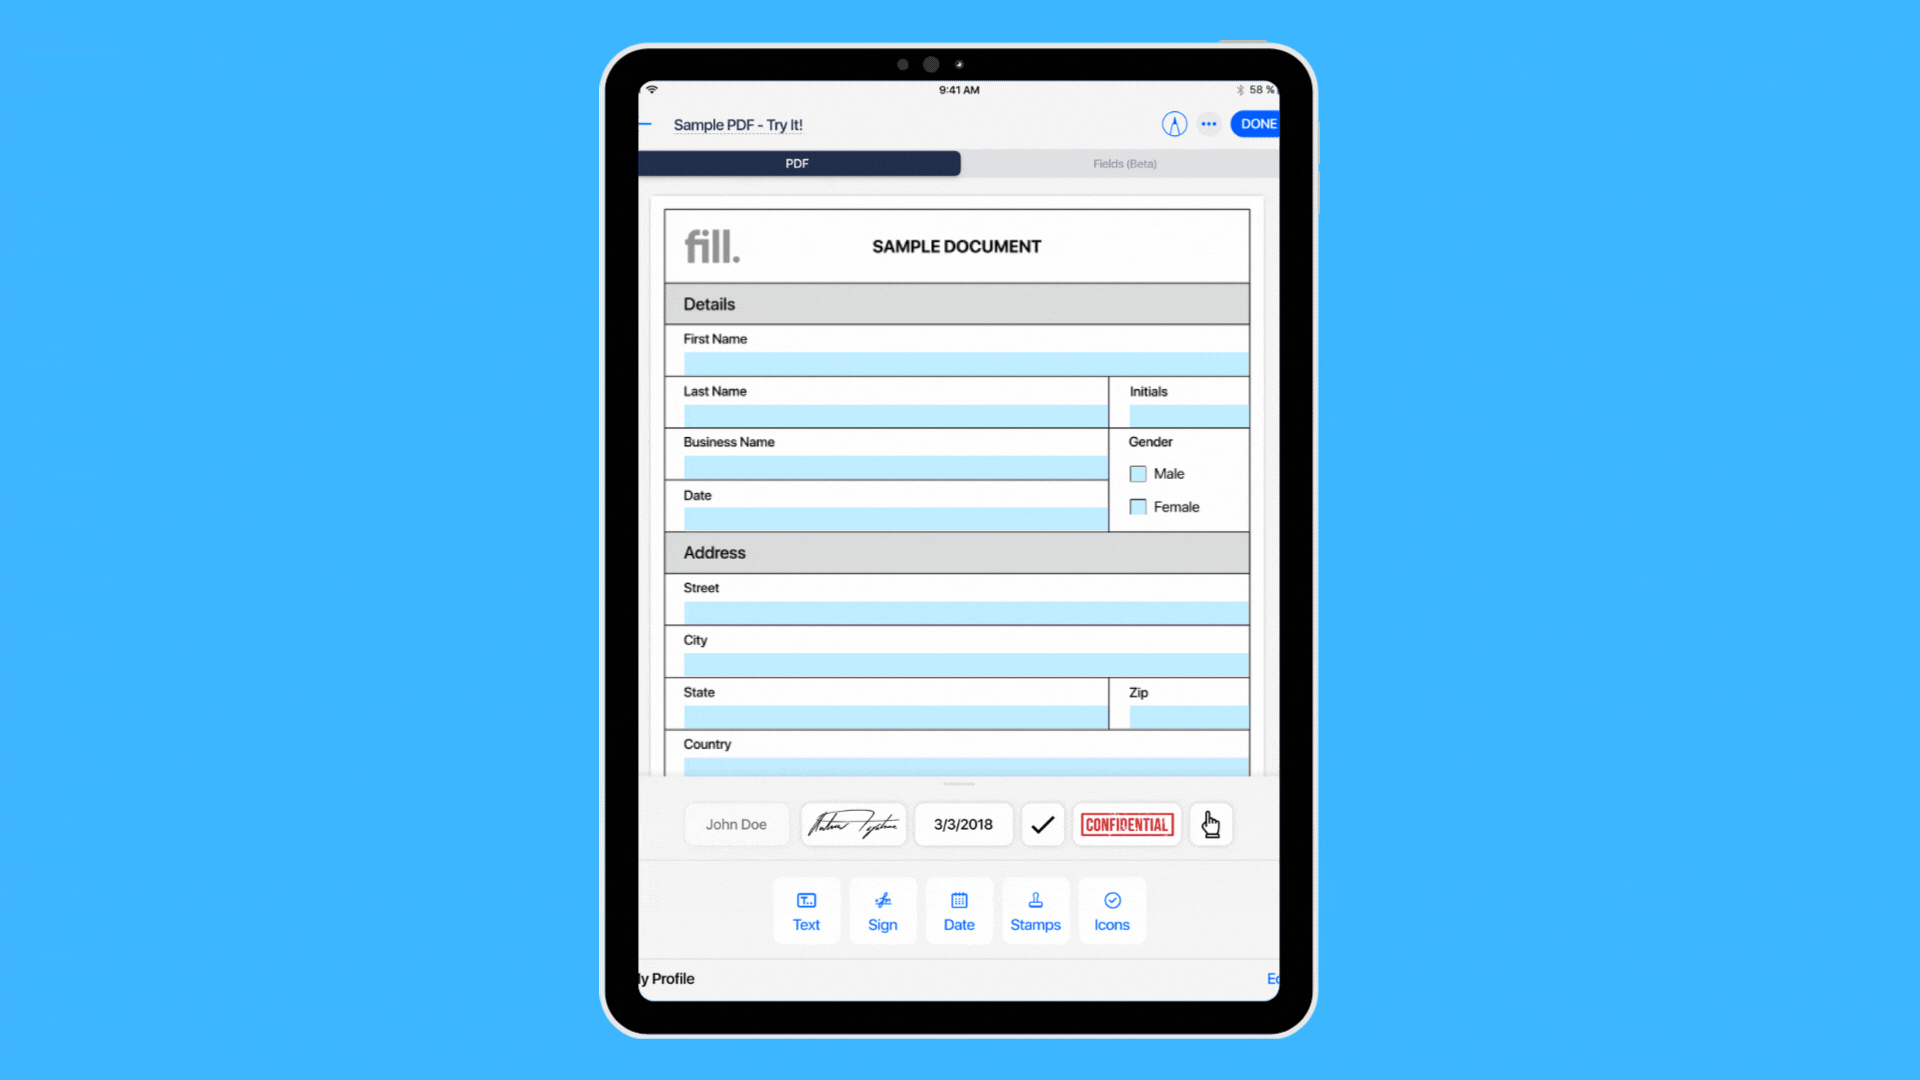
- Customize the form by adding fillable fields to get the information you need. You can even add a field for electronic signatures.
- Once you’re done, click Publish.
- You should be able to generate a link that you can share with your respondents via email.
The entire process takes less than 10 minutes to complete. Plus, you can reuse these online forms and send them to as many respondents as you wish.
In today’s fast-paced world, many digital solutions are designed to simplify and speed up various tasks. When it comes to collecting information to help you make informed business decisions, consider investing in trusted software that lets you convert existing PDF files to online forms.
How do I fill out online forms?
To fill out an online form on Fill, you first need to access the form itself via the link provided. Simply click on the link and you can start typing in the needed information. You can use a laptop, desktop computer, smartphone, or tablet to fill out online forms. Remember, you need a stable internet connection to access and alter online forms, otherwise your responses might not be saved.
You do not need to have a Fill account to fill out the online forms created with this tool. You do, however, need to have the link to the online form to gain access. Once you have the link, you can input all the necessary information in the required fields.
One of the best things about using Fill’s Online Form is that it’s easy to identify which section needs to be filled out. The topmost part of the form tells you how many fields you still need to answer. Each form has a guide that lets you know which spaces you need to provide answers or data. Some fields are also prefilled, meaning you can just select from the options provided. Once you complete the online form, you can send it back by clicking the arrow above the page.
How to share the online forms?
With Fill, you can share online forms in a matter of seconds. All you need to do is to share the link to the fillable form. You can do this via email or a messaging app.
Anyone who has the link has access to the form and can then fill it out. Once they are done filling out the online form, you can view their responses on Fill’s dashboard. You can also view the form analytics to see how many have opened and filled out the form, the average completion time, and other useful data.
Fill is an all-around office tool that simplifies your document management workflow. When you convert your PDF documents to fillable online forms, sharing becomes more straightforward and convenient. Fill automatically generates a link for your document once you have uploaded it to fill and added fillable fields to it.
Not so many years ago, organizations had to manually collect data from respondents using actual, physical copies of forms. They distribute it to the concerned individuals, then collect the forms, and finally tabulate the data. Needless to say, the manual process is time-consuming and quite tedious. Luckily, you can now use online tools like Fill to make your data collection process more efficient.
Are online forms secure?
Absolutely! We only use the highest level of security measures as well as military-grade 256-bit end-to-end encryption, which protects your data against cyber threats and breaches. You are rest assured that when you fill out an online form or create a fillable PDF on Fill, only authorized parties can access your responses. Your data will not be compromised, shared, or disclosed to unauthorized parties without your consent. We also include identity verification to further ensure the security of your data.
Our robust security measures make Fill one of the most reliable tools used to collect data for your market research. You can also use Fill’s live forms to get feedback from your customers or clients. And since Fill allows you to create HIPAA-compliant online forms, you can use our live form to gather patient health information (PHI) and other confidential data. Fill is also complies with the standards set by GLBA (Gramm-Leach-Bliley Act), a federal law that governs how financial institutions share private and sensitive data of their clients.
Here at Fill, we put the safety and security of your data at the forefront of our services. Our top-rated features are designed to maintain the confidentiality of your documents and all the information it contains. Our live forms are secure and easy to use, making them ideal for businesses and organizations from various industries to use.
How do I sign online forms?
You can sign eforms for free using Fill. To do so, you first need to access the form through a link. Then, enter your basic information, such as your name and email address. Once you’re there, you can view the online form and supply the necessary data required.
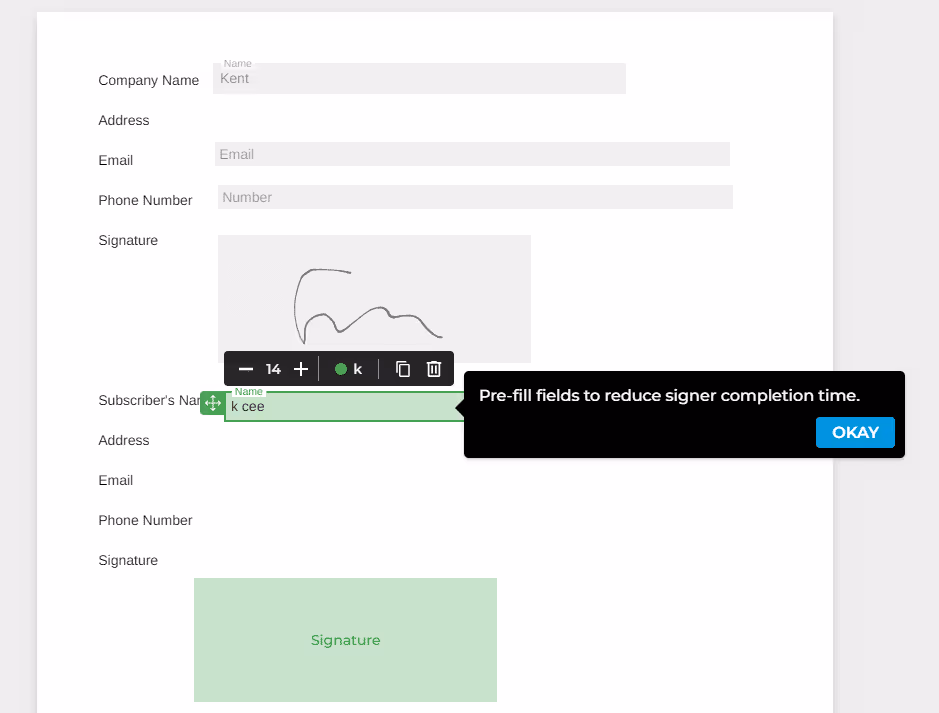
After that, click the corresponding fillable field to add your signature. You can sign an online form in three ways:
- Typing your name or initial. You can select from a wide range of fonts to customize your signature.
- Drawing your signature on Fill. You can use Fill’s on-screen canvas if you’re using your mobile phone or tablet. You can also use your mouse if you’re on a desktop.
- Uploading a digital copy of your electronic signature. You can upload a photo of your signature and insert it in the appropriate field.
Once you are done filling out the signature form, click Done to submit it. You will receive a copy of the online form via email as confirmation that you have successfully completed the form.
With Fill, you do not have to worry about the safety and security of your data. When you sign an esignature form using Fill’s platform, you are guaranteed maximum data protection and confidentiality.